
So before trying to get the planned stepper motors running, I quickly put a dc motors setup together:
-
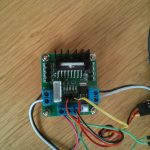
- The fully wired l298n
-

- mobile setup
-
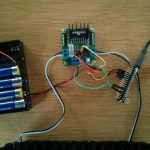
- arduino micro supporting 5V and IN1,IN2,IN3,IN4
I’ve got two dc motors coming with my make block robot starter kit. And for research I also ordered a small l298n motor controller shield which is able to control motors up to 24Vs and 2A each by 4 small input wires at for example 3,3V and 2 additional +5V motor enablers.
There is a nice little page which explains all states of the L298N according to the arduino micro here. For a [amazon &title=Raspberry Pi&text=Raspberry Pi] I found a nice Youtube video explaining everything here.
For me in the end both motors rotated quite nicely, like this video shows:
For the micro I wrote this peace of code:
const int IN1 = 10;
const int IN2 = 11;
const int IN3 = 8;
const int IN4 = 9;

void setup()
{
  pinMode(IN1, OUTPUT);
  pinMode(IN2, OUTPUT);
  pinMode(IN3, OUTPUT);
  pinMode(IN4, OUTPUT);
}

void loop()
{
  digitalWrite(IN1, HIGH);
  digitalWrite(IN2, LOW);
  digitalWrite(IN3, HIGH);
  digitalWrite(IN4, LOW);

  //hold speed fro 5 seconds
  for(byte j = 5; j > 0; j--)
  {
    delay(1000);
  }

  //stop for two seconds.
  digitalWrite(IN1, LOW);
  digitalWrite(IN2, LOW);
  digitalWrite(IN3, LOW);
  digitalWrite(IN4, LOW);
  delay(2000);

  //switching direction
  digitalWrite(IN1, LOW);
  digitalWrite(IN2, HIGH);
  digitalWrite(IN3, LOW);
  digitalWrite(IN4, HIGH);


 //hold speed for 5 seconds
 for(byte u = 5; u > 0; u--)
  {
    delay(1000);
  }
}

