Category Archives: internal video

Controlling ws2812b with an esp8266 by open-pixel-control protocol

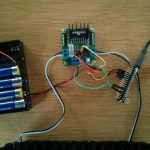
Harder than it looks but controlling an 5m led stripe using the esp8266 by the open pixel control protocol took me a night (and might be the reason for extra bad english as i write this post directly after it). But it’s real fun!

There are several ways to make the controller blink, the easiest way is shown here:

while true; do ( echo -en '\x00\x00\x02\xA6'; dd if=/dev/urandom bs=678 count=1 status=none ) | ncat --send-only --udp 172.22.99.155 2342; sleep 0.1; done

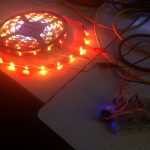
For the duration of infintiy, it sends the static header consisting of 4 bytes ( prio, command and checksum) followed by 8bit red 8bit green and 8bit blue for each led of the stripe. It gets the blinking values by asking the source of random in linux.  It lacks a bit of white as my power source got to its limits, so if you reimplement this use 5V and 1A per 30 leds.

Another thing to mention is the data length field which are bytes 3-4 of the header or \x02\xA6 as in the command above. This length needs to equal the amount of leds times three, so in this example 226 Leds where controlled as the bytes in network order end up to be 678.

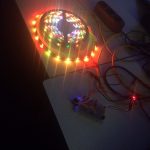
This results in that little animation:

Youtube Video

Another possibility is to send these packets by a small python script like that:

import socket
import time

from struct import *

HOST = 'your-hostname'    
PORT = 2342              
colors = [(255,255,255), (255,0,0) ,(0,0,255), (0,255,0)  ]


for color in colors:
        print "sending color {} {} {}".format(color[0],color[1],color[2])
        data = [pack('b',0),pack('b',0), pack('!h',678)];

        for i in range(0,226):
                data.append(pack('BBB',color[0],color[1],color[2]))

        s = socket.socket(socket.AF_INET, socket.SOCK_DGRAM)


        for i in range(0,1024):
                s.sendto("".join(data),(HOST,PORT))

        time.sleep(0.5)
        s.close()

import pdb; pdb.set_trace()

Code for the controller at github.

Complex Low-Cost Robotics – Lighting Talk at Datenspuren 2015

Hi there, I did a small lightning talk at the Datenspuren 2015. I expect the talk to be recorded but not published yet. All videos will be available at the Dataspuren Recordings Page. But in case you want to show the slides to somebody download them here.

UPDATE
Talk is online (my part starts at min 37:45) . Because linking didn’t really work, I cut the original video and uploaded my five minutes to youtube. The talk is in German, but I’ve added english subtitles:
Youtube Video

To see the mentioned robot in action, you can see this little video I posted some time ago.

Youtube Video
Do not hesitate to contact me, I am kinda available to hire and traveling through vienna the next week 🙂

Six legs two Motors

Hexbug 477-2423 – Scarab XL


Youtube Video
available on amazon for 25€ 🙂

my first Thinkpad T450s experiences

tl;dr probably my device was laptop version of a lemon car, which took me nuts, but still I want to have (a properly working) T450s again

IMG_20150221_193556

I recently got a brand new Thinkpad T450s, which I was waiting for since December and yet I am writing this post from my old sloppy Asus F3JA. You might just ask yourself why – well, the reasons are multifarious, but in the end lead to send it back to the producer. First the positive things: the 14” FullHD display is amazing, the magnesium case very stable and nice – the background led keyboard really impressed me and increased my coding experiences. Both of the integrated and the external battery held longer than every device I had but still…

iwlwifi drove me mad, unable to hold a connection longer than a few minutes – it interupted my workflow significantly. Furthermore several parts like brightness, power saving settings didn’t work properly and blended me at night while burning power. Last but not least, the squeak of doom:

Youtube Video

Every time you put your hand on the laptop it groaned as like it didn’t like to be used. After two days I shred the 320Gb SDD the times by overwriting it with random data and sent it back as a warranty case. Hopefully this device will be replaced as all of the errors I had didn’t occur on my colleagues T450s, who has got it in the same order and time.

But still and in conclusion: I really like the T450s, it is very light, feels right, is really powerful and mobile. Its 14” fit perfectly into an usual european A4 (default paper size) bag and its case keep it intact. Overall I really look forward to get a properly working version of this little fellow soon.

LeapMotion and ROS

Today I’ve got the chance to get my hands on a Leap Motion. As it uses depth information to track hands on a short range from the device and as there is a ros driver package existing for it, I hoped to get a 3D PointCloud. It costs about 80€ and could have been a cheap replacement for the [amazon &title=Xtion&text=Asus Xtion].

Unfortunately its not possible (yet?) – here is a very nice post why.

But it is fun anyways to get both hands tracked:

Youtube Video

The ros driver interfaces ros with only one hand – but we could do something like shown below to control the amosero:

Youtube Video

Later it would be a nice way to control a robot arm – but for now we leave that nice little device as there is a lot of other stuff to be done.

Raspberry Pi Robot #2

I’ve connected the [amazon &title=Raspberry Pi&text=Raspberry Pi] to an L298N and two 6V DC Motors, which have been in the Makeblock Starter Kit. I’ve had some issues with the WPA2 Enterprise TLS Network, which is why there is an cable attached.

IMG_20140521_164828

I’ve also written a small geometry/Twist controller for ROS-compatibility,for controlling the robots movement with keyboard interop like I did before.

Before I dismantle this little robot, I’ve like to share a little video:
Youtube Video

As soon as possible I will use the arduino micro and the two 250rpm stepper motors – for that I am planning to use a Arduino Motor shield that I’ve already ordered.

Howto run a 12V bipolar stepper motor with arduino micro and L298N at 150rpm

Today I experimented with a 12V bipolar stepper motor and the 5V arduino micro.

To get things working I’ve put the 9V from my six 1.5V Batteries into an UBEC which accelerates them to 12V at a loss of below 10% (at 350mAh) connected them to the VCC of the L298N and wired the 4 signal cables of the motors to it. Because thats a lot of numbers to keep track of – I’ve made a small video of the setup:

Youtube Video

Doing the math according to a wheel with 5,8cm heigth and 150rpm I’ve reached, my robot will be able to run about 1,6 km/h – this might be increased with a better motor driver like they used on the arduino motor shield. I’ve read they reached about 250 rpm on the same motor which would be 2,73km/h.

The code of the arduino is pretty simple:

#include <Stepper.h>

const int stepsPerRevolution = 200;  // change this to fit the number of steps per revolution
// for your motor


// init the stepper lib on pins 8 through 11:
Stepper myStepper(stepsPerRevolution, 8,9,10,11);            

void setup() {
  // nothing to do inside the setup
}

void loop() {
    myStepper.setSpeed(150);
    myStepper.step(stepsPerRevolution/100); 
}


Howto run two 6V DC motors with arduino micro

So before trying to get the planned stepper motors running, I quickly put a dc motors setup together:

I’ve got two dc motors coming with my make block robot starter kit. And for research I also ordered a small l298n motor controller shield which is able to control motors up to 24Vs and 2A each by  4 small input wires at  for example 3,3V and 2 additional +5V motor enablers.

There is a nice little page which explains all states of the L298N according to the arduino micro here. For a [amazon &title=Raspberry Pi&text=Raspberry Pi] I found a nice Youtube video explaining everything here.

For me in the end both motors rotated quite nicely, like this video shows:

Youtube Video

For the micro I wrote this peace of code:

const int IN1 = 10;
const int IN2 = 11;
const int IN3 = 8;
const int IN4 = 9;

void setup()
{
  pinMode(IN1, OUTPUT);
  pinMode(IN2, OUTPUT);
  pinMode(IN3, OUTPUT);
  pinMode(IN4, OUTPUT);
}
 
void loop()
{
  digitalWrite(IN1, HIGH);
  digitalWrite(IN2, LOW);  
  digitalWrite(IN3, HIGH);
  digitalWrite(IN4, LOW);
  
  //hold speed fro 5 seconds
  for(byte j = 5; j > 0; j--) 
  {
    delay(1000);
  }
  
  //stop for two seconds.
  digitalWrite(IN1, LOW);
  digitalWrite(IN2, LOW);  
  digitalWrite(IN3, LOW);
  digitalWrite(IN4, LOW);
  delay(2000);
  
  //switching direction
  digitalWrite(IN1, LOW); 
  digitalWrite(IN2, HIGH);  
  digitalWrite(IN3, LOW); 
  digitalWrite(IN4, HIGH);
 

 //hold speed for 5 seconds
 for(byte u = 5; u > 0; u--)
  {
    delay(1000);
  }
}


Rasberry Pi Robot with ROS, Xtion and working base_controller teleop

Before I dismantle my little [amazon &title=Raspberry Pi&text=Raspberry Pi] Robot #1 , I wanted to have a little video of its base_controller working together with the turtlebot teleop. It uses the geometry/Twist messages to transmit moving information like a lot of ROS Robots do.

Youtube Video

As you see there is a little acceleration control implemented which makes the robot start smoothly and stop after gently after no key is pressed anymore. In case of emergency its possible to hit e.g. the space bar for a instant full stop.

This robot isn’t very fast – but the next one will be. So this was a successful ROS-learning robot which I can recommend to everyone who wants to know how ROS Robots work.
Its a bit hard to get all of the source compiled on the small arm cpu, and there are nearly no precompiled packages – but it takes away all the fear from compiling errors in the future 🙂