Category Archives: Howtos

Howto run a 12V bipolar stepper motor with arduino micro and L298N at 150rpm

Today I experimented with a 12V bipolar stepper motor and the 5V arduino micro.

To get things working I’ve put the 9V from my six 1.5V Batteries into an UBEC which accelerates them to 12V at a loss of below 10% (at 350mAh) connected them to the VCC of the L298N and wired the 4 signal cables of the motors to it. Because thats a lot of numbers to keep track of – I’ve made a small video of the setup:

Youtube Video

Doing the math according to a wheel with 5,8cm heigth and 150rpm I’ve reached, my robot will be able to run about 1,6 km/h – this might be increased with a better motor driver like they used on the arduino motor shield. I’ve read they reached about 250 rpm on the same motor which would be 2,73km/h.

The code of the arduino is pretty simple:

#include <Stepper.h>

const int stepsPerRevolution = 200;  // change this to fit the number of steps per revolution
// for your motor


// init the stepper lib on pins 8 through 11:
Stepper myStepper(stepsPerRevolution, 8,9,10,11);            

void setup() {
  // nothing to do inside the setup
}

void loop() {
    myStepper.setSpeed(150);
    myStepper.step(stepsPerRevolution/100); 
}


Howto run two 6V DC motors with arduino micro

So before trying to get the planned stepper motors running, I quickly put a dc motors setup together:

I’ve got two dc motors coming with my make block robot starter kit. And for research I also ordered a small l298n motor controller shield which is able to control motors up to 24Vs and 2A each by  4 small input wires at  for example 3,3V and 2 additional +5V motor enablers.

There is a nice little page which explains all states of the L298N according to the arduino micro here. For a [amazon &title=Raspberry Pi&text=Raspberry Pi] I found a nice Youtube video explaining everything here.

For me in the end both motors rotated quite nicely, like this video shows:

Youtube Video

For the micro I wrote this peace of code:

const int IN1 = 10;
const int IN2 = 11;
const int IN3 = 8;
const int IN4 = 9;

void setup()
{
  pinMode(IN1, OUTPUT);
  pinMode(IN2, OUTPUT);
  pinMode(IN3, OUTPUT);
  pinMode(IN4, OUTPUT);
}
 
void loop()
{
  digitalWrite(IN1, HIGH);
  digitalWrite(IN2, LOW);  
  digitalWrite(IN3, HIGH);
  digitalWrite(IN4, LOW);
  
  //hold speed fro 5 seconds
  for(byte j = 5; j > 0; j--) 
  {
    delay(1000);
  }
  
  //stop for two seconds.
  digitalWrite(IN1, LOW);
  digitalWrite(IN2, LOW);  
  digitalWrite(IN3, LOW);
  digitalWrite(IN4, LOW);
  delay(2000);
  
  //switching direction
  digitalWrite(IN1, LOW); 
  digitalWrite(IN2, HIGH);  
  digitalWrite(IN3, LOW); 
  digitalWrite(IN4, HIGH);
 

 //hold speed for 5 seconds
 for(byte u = 5; u > 0; u--)
  {
    delay(1000);
  }
}


Howto use CubieTruck and tightVNCserver

VNC is a nice tool for remote desktop administration. But like a lot of things, it doesn’t work out of the box on the [amazon &title=CubieTruck&text=CubieTruck].

After installing the tightvncserver with

sudo apt-get install tightvncserver

I started and configured the server with

tightvncserver

and tried to login to [amazon &title=CubieTruck&text=CubieTruck]IP:5091 I got a grey screen and nothing more happend. So I suppose thats a blank X instead the Lxde I expected.

So tighvnc server has a small script thats executed after you login with vnc to a server, it is located at ~/.vnc/xstartup and contains by default something like that:

#!/bin/sh

xrdb $HOME/.Xresources
xsetroot -solid grey
#x-terminal-emulator -geometry 80x24+10+10 -ls -title "$VNCDESKTOP Desktop" &
#x-window-manager &
# Fix to make GNOME work
export XKL_XMODMAP_DISABLE=1
/etc/X11/Xsession

So the VNC really starts a Xsession.. simply comment the last line out (use a #) and add this:

/usr/bin/lxsession -s Lubuntu -e LXDE

Now it should be possible to use a vnc viewer of your joice – like remmina and connect to your [amazon &title=CubieTruck&text=CubieTruck] using the 5901 port:

Screenshot - 13.05.2014 - 20:09:21


Howto get a CubieTruck WLAN working

Note: Please see the new version of this post

For some reason the WLAN of the [amazon &title=CubieTruck&text=CubieTruck] didn’t work out of the box. So to save you the day I spent to get it working I wrote this little step by step tutorial:

1. load the wlan driver by typing

modprobe bcmdhd

in case you don’t want to do that everytime the [amazon &title=CubieTruck&text=CubieTruck] needs wifi consider adding a new line with ‘bcmdhd’ (no quotes) to /etc/modules

2. install linux-firmware

sudo apt-get install linux-firmware -y

and reboot

sudo reboot

3. bring the wlan0 device up and scan if your wlan is available

sudo -i #get root 
ifconfig wlan0 up
iwlist wlan0 scan

4. add this wlan to your connection configuration file (replace yourSSID and yourPasswd accordingly)

sudo -i #get or stay root
wpa_passphrase yourSSID yourPasswd >> /etc/wpa_supplicant.conf

5. add following lines to /etc/network/interfaces

auto wlan0
iface wlan0 inet dhcp
wpa-conf /etc/wpa_supplicant.conf

6. add DNS Information to /etc/resolv.conf (attention, we’ll use google in that example)

nameserver 8.8.8.8

7. restart networking to get changes to action

sudo service networking restart

If everything went well, your wlan0 device should have an IP when checking it with

ifconfig wlan0 

Controlling a stepper motor 28BYJ-48 with a Raspberry Pi

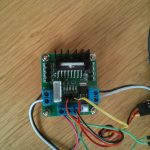
Actually there is no need to explain more about stepper motors than that video does:

Youtube Video

Currently I am using this python code to get the motors running:

#!/usr/bin/env python
 
# import required libs
import time
import RPi.GPIO as GPIO

GPIO.cleanup() #cleaning up in case GPIOS have been preactivated
 
# Use BCM GPIO references
# instead of physical pin numbers
GPIO.setmode(GPIO.BCM)
 
# be sure you are setting pins accordingly
# GPIO10,GPIO9,GPIO11,GPI25
StepPins = [10,9,11,25]
 
# Set all pins as output
for pin in StepPins:
  GPIO.setup(pin,GPIO.OUT)
  GPIO.output(pin, False)

#wait some time to start
time.sleep(0.5)
 
# Define some settings
StepCounter = 0
WaitTime = 0.0015
 
# Define simple sequence
StepCount1 = 4
Seq1 = []
Seq1 = range(0, StepCount1)
Seq1[0] = [1,0,0,0]
Seq1[1] = [0,1,0,0]
Seq1[2] = [0,0,1,0]
Seq1[3] = [0,0,0,1]
 
# Define advanced sequence
# as shown in manufacturers datasheet
StepCount2 = 8
Seq2 = []
Seq2 = range(0, StepCount2)
Seq2[0] = [1,0,0,0]
Seq2[1] = [1,1,0,0]
Seq2[2] = [0,1,0,0]
Seq2[3] = [0,1,1,0]
Seq2[4] = [0,0,1,0]
Seq2[5] = [0,0,1,1]
Seq2[6] = [0,0,0,1]
Seq2[7] = [1,0,0,1]

#Full torque
StepCount3 = 4
Seq3 = []
Seq3 = [3,2,1,0]
Seq3[0] = [0,0,1,1]
Seq3[1] = [1,0,0,1]
Seq3[2] = [1,1,0,0]
Seq3[3] = [0,1,1,0]
 
# set
Seq = Seq2
StepCount = StepCount2
 
# Start main loop
try:
  while 1==1:
    for pin in range(0, 4):
      xpin = StepPins[pin]
      if Seq[StepCounter][pin]!=0:
        #print " Step %i Enable %i" %(StepCounter,xpin)
        GPIO.output(xpin, True)
      else:
        GPIO.output(xpin, False)
    StepCounter += 1

  # If we reach the end of the sequence
  # start again
    if (StepCounter==StepCount):
      StepCounter = 0
    if (StepCounter<0):
      StepCounter = StepCount
 
  # Wait before moving on
    time.sleep(WaitTime)
except:
  GPIO.cleanup();
finally: #cleaning up and setting pins to low again (motors can get hot if you wont) 
  GPIO.cleanup();
  for pin in StepPins:
    GPIO.setup(pin,GPIO.OUT)
    GPIO.output(pin, False)

it is based on code by matt.hawkins but with some improvements I did.

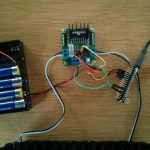
Please be sure you set your GPIOs accordingly to your [amazon &title=Raspberry Pi&text=Raspberry Pi] Revision. So mine was REV 2.0.

Run the code with

sudo python nameOfTheFile.py

and hit [Ctrl]+[C] to stop it. All pins will be set to low afterwards.

In case you want control two motors of this type see another post I made here.


For a different version see:
http://www.intorobotics.com/control-stepper-motors-raspberry-pi-tutorials-resources/http://www.elektronx.de/tutorials/schrittmotorsteuerung-mit-dem-raspberry-pi/ 

Howto: OpenCV 2.4.9 on Raspberry Pi from source

OpenCV is a powerful tool for building computer vision based applications. For one of my projects, I needed it to be compiled on my Raspberry.

Installing it from repositories was not an option because of its too old version.
If this wouldn’t bother you, consider using: sudo apt-get install libopencv-dev

Here is how I installed it on my Rasbian Wheezy from source:

prerequisites:

sudo apt-get -y install build-essential cmake cmake-qt-gui pkg-config libpng12-0 libpng12-dev libpng++-dev libpng3 libpnglite-dev zlib1g-dbg zlib1g zlib1g-dev pngtools libtiff4-dev libtiff4 libtiffxx0c2 libtiff-tools libjpeg8 libjpeg8-dev libjpeg8-dbg libjpeg-progs ffmpeg libavcodec-dev libavcodec53 libavformat53 libavformat-dev libgstreamer0.10-0-dbg libgstreamer0.10-0 libgstreamer0.10-dev libxine1-ffmpeg libxine-dev libxine1-bin libunicap2 libunicap2-dev libdc1394-22-dev libdc1394-22 libdc1394-utils swig libv4l-0 libv4l-dev python-numpy libpython2.6 python-dev python2.6-dev libgtk2.0-dev pkg-config

after that:

downloading the zipfile into a folder located in $HOME

mkdir ~/opencv
cd ~/opencv
wget http://downloads.sourceforge.net/project/opencvlibrary/opencv-unix/2.4.9/opencv-2.4.9.zip 
unzip opencv*.zip
cd opencv*
mkdir build
cd ./build/
cmake -D CMAKE_BUILD_TYPE=RELEASE -D CMAKE_INSTALL_PREFIX=/usr/local -D BUILD_PYTHON_SUPPORT=ON -D BUILD_EXAMPLES=ON
make
sudo make install

Make took about 6-7 hours on my Raspberry Pi, so be sure you have a stable connection or consider using a tool like ‘screen’.

Please also see:

For  openni2_camera it’s not necessary to go further like other posts suggested.