Category Archives: Raspberry Pi

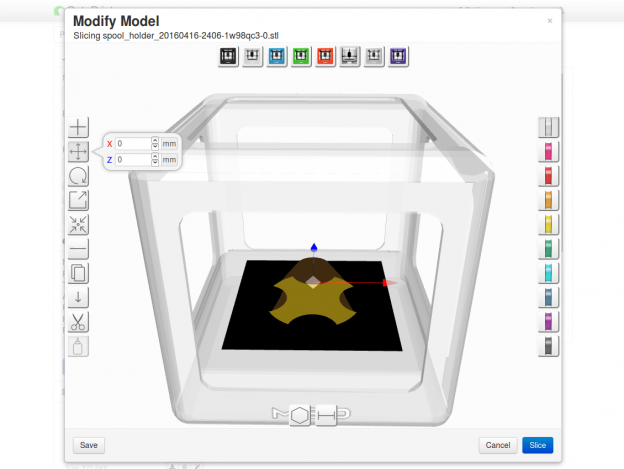
Octoprint - M33-Fio - Raspberry Pi - select positions on the print bed

Running M3D Micro under Raspbian with Octoprint and MD3Fio plugin

The M3D Software is windows only, which causes a lot of wasted power by running a windows machine all time. After several and some successful attempts of running this software on a virtual machine inside my Linux, I figured out a much more easy way to print from a Raspberry Pi. It’s called Octoprint, but on an armhf basis requires a bit attention. In combination with the M33-Fio Plugin its serving perfectly as a printing server for the M3D-Micro I own.

Setting up your Raspberry Pi 3

To save me and you some time in future, I share the step by step code to set up an Raspberry Pi 3 with Octoprint from scratch. (even if there is an image down-loadable from Octroprint Website)

#allow pi user to communicate with printer via tty
sudo usermod -a -G tty pi
sudo usermod -a -G dialout pi

#install cura slicing engine by compiling it from source
cd ~
sudo apt-get install -y python-wxgtk2.8 python-numpy
git clone https://github.com/daid/Cura.git
cd Cura
#installing the requirements of Cura
sudo pip install -r requirements.txt
mkdir CuraEngine
cd CuraEngine
wget -OCuraEngine http://octoprint.org/files/octopi/cura_engine_14.12/cura_engine
chmod +x CuraEngine
cd ..
{ echo '#!/bin/sh'; echo 'PYTHONPATH=. python2 -m Cura.cura "$@"'; } > cura.sh
#also if we don't use the wrapper, we still make it executable
chmod +x cura.sh

#install octoprint
cd ~
sudo apt-get install -y python-pip python-dev python-setuptools python-virtualenv git libyaml-dev build-essential
git clone https://github.com/foosel/OctoPrint.git
cd OctoPrint
virtualenv venv
./venv/bin/pip install pip --upgrade
./venv/bin/python setup.py install
#install the requirements
sudo pip install -r requirements.txt
#install the m3d (or m33) fio plugin
sudo /usr/bin/pip install https://github.com/donovan6000/M33-Fio/archive/master.zip
mkdir ~/.octoprint
ufw allow 5000
./run

Start using Octoprint in browser

Start your browser at 127.0.0.1:5000 (or the ip of your rasbperry) and config Octoprint further:

Happy printing! With this combination of 3-5 Watt Raspberry Pi, and a maximum 20W M3D you can run the printer 24/7 without wasting more than a light bulb amount of power 🙂

Links:

Howto flash an image to Raspberry Pi or Banana Pi using dd and a progressbar

Most tools don’t show reliable progress informationwhen flashing an operating system to an ssd card. In case you use dd to copy, this issue can be solved by the nice pv tool with:

pv -tpreb /path/to/image.img | dd of=/dev/yourUSBorSDSlotTarget bs=1M

which results in:

pvScreenshot21.01.2015

And really lighten up the time when flashing your Pi devices like Raspberry Pi or BananaPi.


Raspberry Pi Robot #2

I’ve connected the [amazon &title=Raspberry Pi&text=Raspberry Pi] to an L298N and two 6V DC Motors, which have been in the Makeblock Starter Kit. I’ve had some issues with the WPA2 Enterprise TLS Network, which is why there is an cable attached.

IMG_20140521_164828

I’ve also written a small geometry/Twist controller for ROS-compatibility,for controlling the robots movement with keyboard interop like I did before.

Before I dismantle this little robot, I’ve like to share a little video:
Youtube Video

As soon as possible I will use the arduino micro and the two 250rpm stepper motors – for that I am planning to use a Arduino Motor shield that I’ve already ordered.

Rasberry Pi Robot with ROS, Xtion and working base_controller teleop

Before I dismantle my little [amazon &title=Raspberry Pi&text=Raspberry Pi] Robot #1 , I wanted to have a little video of its base_controller working together with the turtlebot teleop. It uses the geometry/Twist messages to transmit moving information like a lot of ROS Robots do.

Youtube Video

As you see there is a little acceleration control implemented which makes the robot start smoothly and stop after gently after no key is pressed anymore. In case of emergency its possible to hit e.g. the space bar for a instant full stop.

This robot isn’t very fast – but the next one will be. So this was a successful ROS-learning robot which I can recommend to everyone who wants to know how ROS Robots work.
Its a bit hard to get all of the source compiled on the small arm cpu, and there are nearly no precompiled packages – but it takes away all the fear from compiling errors in the future 🙂


Controlling two 28BYJ-48 Stepper Motors with Raspberry Pi

I’ve taken some code written by Stephen C Phillips and added/modified a few lines so its possible to run two motors at once, even with different directions.

#!/usr/bin/env python

# This code is written by Stephen C Phillips http://scphillips.com.
# and modified by Paul Petring http://defendtheplanet.net
# It is in the public domain, so you can do what you like with it
# but a link to our websites would be nice.

# It works on the [amazon &title=Raspberry Pi&text=Raspberry Pi] computer with the standard Debian Wheezy OS and
# the 28BJY-48 stepper motor with ULN2003 control board.

from time import sleep
import RPi.GPIO as GPIO
from thread import start_new_thread
import sys

class Motor(object):
    def __init__(self, pins):
        self.P1 = pins[0]
        self.P2 = pins[1]
        self.P3 = pins[2]
        self.P4 = pins[3]
        self.deg_per_step = 5.625 / 64
        self.steps_per_rev = int(360 / self.deg_per_step)  # 4096
        self.step_angle = 0  # Assume the way it is pointing is zero degrees
        for p in pins:
            GPIO.setup(p, GPIO.OUT)
            GPIO.output(p, 0)
    def __exit__(self, type, value, traceback):
       self.clean_pins_up()
    def _set_rpm(self, rpm):
        """Set the turn speed in RPM."""
        self._rpm = rpm
        # T is the amount of time to stop between signals
        self._T = (60.0 / rpm) / self.steps_per_rev

    # This means you can set "rpm" as if it is an attribute and
    # behind the scenes it sets the _T attribute
    rpm = property(lambda self: self._rpm, _set_rpm)
    def clean_pins_up(self):
        GPIO.output(self.P1, 0)
        GPIO.output(self.P2, 0)
        GPIO.output(self.P3, 0)
        GPIO.output(self.P4, 0)
def move_to(self, angle):
        """Take the shortest route to a particular angle (degrees)."""
        # Make sure there is a 1:1 mapping between angle and stepper angle
        target_step_angle = 8 * (int(angle / self.deg_per_step) / 8)
        steps = target_step_angle - self.step_angle
        steps = (steps % self.steps_per_rev)
        if steps > self.steps_per_rev / 2:
            steps -= self.steps_per_rev
            print "moving " + `steps` + " steps"
            self._move_acw(-steps / 8)
        else:
            print "moving " + `steps` + " steps"
            self._move_cw(steps / 8)
        #self.step_angle = target_step_angle #in case you want to keep track of the position
        self.step_angle = 0

    def _move_acw(self, big_steps):
        self.clean_pins_up()
        for i in range(big_steps):
            GPIO.output(self.P1, 0)
            sleep(self._T)
            GPIO.output(self.P3, 1)
            sleep(self._T)
            GPIO.output(self.P4, 0)
            sleep(self._T)
            GPIO.output(self.P2, 1)
            sleep(self._T)
            GPIO.output(self.P3, 0)
            sleep(self._T)
            GPIO.output(self.P1, 1)
            sleep(self._T)
            GPIO.output(self.P2, 0)
            sleep(self._T)
            GPIO.output(self.P4, 1)
            sleep(self._T)
        self.clean_pins_up()
def _move_cw(self, big_steps):
        GPIO.output(self.P1, 0)
        GPIO.output(self.P2, 0)
        GPIO.output(self.P3, 0)
        GPIO.output(self.P4, 0)
        for i in range(big_steps):
            GPIO.output(self.P3, 0)
            sleep(self._T)
            GPIO.output(self.P1, 1)
            sleep(self._T)
            GPIO.output(self.P4, 0)
            sleep(self._T)
            GPIO.output(self.P2, 1)
            sleep(self._T)
            GPIO.output(self.P1, 0)
            sleep(self._T)
            GPIO.output(self.P3, 1)
            sleep(self._T)
            GPIO.output(self.P2, 0)
            sleep(self._T)
            GPIO.output(self.P4, 1)
            sleep(self._T)
        self.clean_pins_up()
if __name__ == "__main__":  
    GPIO.cleanup()
    GPIO.setmode(GPIO.BCM)
    m_l = Motor([2,3,14,15])
    m_r = Motor([10,9,11,25])
    m_l.rpm = float(sys.argv[1])
    m_r.rpm = float(sys.argv[1])
    print "Pause in seconds: " + `m_l._T`
    i = 1
    while i < 5:
       start_new_thread(m_l.move_to,(int(sys.argv[2]),))
       start_new_thread(m_r.move_to,(int(sys.argv[3]),))
       sleep(2)
       i=i+1
    GPIO.cleanup()

run the code with the following command:

sudo python motor.py 10 +90 -90

10 stands for rpm (rounds per minute) and +90 -90 as the amount of degrees each motor should turn. I figured out that, with this code and motors the max RPM is around 16, which results in a speed of 16 * 2 * Pi * Radius of your Wheel in cm / m.

This code only demonstrates how to turn the motors with a certain speed and degree. Its not made for rotating wheels yet..

Have fun experimenting 🙂

Controlling a stepper motor 28BYJ-48 with a Raspberry Pi

Actually there is no need to explain more about stepper motors than that video does:

Youtube Video

Currently I am using this python code to get the motors running:

#!/usr/bin/env python
 
# import required libs
import time
import RPi.GPIO as GPIO

GPIO.cleanup() #cleaning up in case GPIOS have been preactivated
 
# Use BCM GPIO references
# instead of physical pin numbers
GPIO.setmode(GPIO.BCM)
 
# be sure you are setting pins accordingly
# GPIO10,GPIO9,GPIO11,GPI25
StepPins = [10,9,11,25]
 
# Set all pins as output
for pin in StepPins:
  GPIO.setup(pin,GPIO.OUT)
  GPIO.output(pin, False)

#wait some time to start
time.sleep(0.5)
 
# Define some settings
StepCounter = 0
WaitTime = 0.0015
 
# Define simple sequence
StepCount1 = 4
Seq1 = []
Seq1 = range(0, StepCount1)
Seq1[0] = [1,0,0,0]
Seq1[1] = [0,1,0,0]
Seq1[2] = [0,0,1,0]
Seq1[3] = [0,0,0,1]
 
# Define advanced sequence
# as shown in manufacturers datasheet
StepCount2 = 8
Seq2 = []
Seq2 = range(0, StepCount2)
Seq2[0] = [1,0,0,0]
Seq2[1] = [1,1,0,0]
Seq2[2] = [0,1,0,0]
Seq2[3] = [0,1,1,0]
Seq2[4] = [0,0,1,0]
Seq2[5] = [0,0,1,1]
Seq2[6] = [0,0,0,1]
Seq2[7] = [1,0,0,1]

#Full torque
StepCount3 = 4
Seq3 = []
Seq3 = [3,2,1,0]
Seq3[0] = [0,0,1,1]
Seq3[1] = [1,0,0,1]
Seq3[2] = [1,1,0,0]
Seq3[3] = [0,1,1,0]
 
# set
Seq = Seq2
StepCount = StepCount2
 
# Start main loop
try:
  while 1==1:
    for pin in range(0, 4):
      xpin = StepPins[pin]
      if Seq[StepCounter][pin]!=0:
        #print " Step %i Enable %i" %(StepCounter,xpin)
        GPIO.output(xpin, True)
      else:
        GPIO.output(xpin, False)
    StepCounter += 1

  # If we reach the end of the sequence
  # start again
    if (StepCounter==StepCount):
      StepCounter = 0
    if (StepCounter<0):
      StepCounter = StepCount
 
  # Wait before moving on
    time.sleep(WaitTime)
except:
  GPIO.cleanup();
finally: #cleaning up and setting pins to low again (motors can get hot if you wont) 
  GPIO.cleanup();
  for pin in StepPins:
    GPIO.setup(pin,GPIO.OUT)
    GPIO.output(pin, False)

it is based on code by matt.hawkins but with some improvements I did.

Please be sure you set your GPIOs accordingly to your [amazon &title=Raspberry Pi&text=Raspberry Pi] Revision. So mine was REV 2.0.

Run the code with

sudo python nameOfTheFile.py

and hit [Ctrl]+[C] to stop it. All pins will be set to low afterwards.

In case you want control two motors of this type see another post I made here.


For a different version see:
http://www.intorobotics.com/control-stepper-motors-raspberry-pi-tutorials-resources/http://www.elektronx.de/tutorials/schrittmotorsteuerung-mit-dem-raspberry-pi/ 

Raspberry Pi Robot #0

I am trying to build my own [amazon &title=Raspberry Pi&text=Raspberry Pi] based robot. Someday, it shall be able to drive autonomously based on data from its [amazon &title=Asus Xtion&text=Asus Xtion] (a smaller version of an Xbox Kinect) and with the help of ROS (Robot Operating System). For today, it is only capable of driving straight forward.

PiRosBot #Zero

Parts:

  • [amazon &title=Asus Xtion&text=Asus Xtion] Pro
  • a [amazon &title=Raspberry Pi&text=Raspberry Pi] Model B Rev.2.0
  • WLAN USB stick
  • two Stepper Motors 28BYJ-48 Datasheet PDF 5V controlled by an ULN2003A Chip
  • an easyAcc Powerbank with 10.000mhA with an MicroUSB Cable supplying 2A of power
  • some metal toy constuction set parts including 3 wheels
  • 8 old female to female jumper wires
  • 2 Y female jumper whires (to share positive and ground of the raspberry with the motors)

With this setup, the raspberry i able to run at least 8 hours by the power of my already a little bit aged powerbank. Driving at an unbelievable slow speed of about 30 seconds per meter (full torque mode of steppers).

For documentation (and for fun, because I never did this before), here a small video of the very first test drive:

Youtube Video


Howto: OpenCV 2.4.9 on Raspberry Pi from source

OpenCV is a powerful tool for building computer vision based applications. For one of my projects, I needed it to be compiled on my Raspberry.

Installing it from repositories was not an option because of its too old version.
If this wouldn’t bother you, consider using: sudo apt-get install libopencv-dev

Here is how I installed it on my Rasbian Wheezy from source:

prerequisites:

sudo apt-get -y install build-essential cmake cmake-qt-gui pkg-config libpng12-0 libpng12-dev libpng++-dev libpng3 libpnglite-dev zlib1g-dbg zlib1g zlib1g-dev pngtools libtiff4-dev libtiff4 libtiffxx0c2 libtiff-tools libjpeg8 libjpeg8-dev libjpeg8-dbg libjpeg-progs ffmpeg libavcodec-dev libavcodec53 libavformat53 libavformat-dev libgstreamer0.10-0-dbg libgstreamer0.10-0 libgstreamer0.10-dev libxine1-ffmpeg libxine-dev libxine1-bin libunicap2 libunicap2-dev libdc1394-22-dev libdc1394-22 libdc1394-utils swig libv4l-0 libv4l-dev python-numpy libpython2.6 python-dev python2.6-dev libgtk2.0-dev pkg-config

after that:

downloading the zipfile into a folder located in $HOME

mkdir ~/opencv
cd ~/opencv
wget http://downloads.sourceforge.net/project/opencvlibrary/opencv-unix/2.4.9/opencv-2.4.9.zip 
unzip opencv*.zip
cd opencv*
mkdir build
cd ./build/
cmake -D CMAKE_BUILD_TYPE=RELEASE -D CMAKE_INSTALL_PREFIX=/usr/local -D BUILD_PYTHON_SUPPORT=ON -D BUILD_EXAMPLES=ON
make
sudo make install

Make took about 6-7 hours on my Raspberry Pi, so be sure you have a stable connection or consider using a tool like ‘screen’.

Please also see:

For  openni2_camera it’s not necessary to go further like other posts suggested.