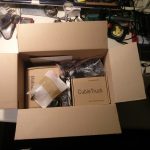
Today the new parts arrived, which is why there will be a lot of new posts soon.
There is a [amazon &title=CubieTruck&text=CubieTruck] in it, better stepper motors, a lot of sensors, tracks and wheels – so a lot of work in a box 🙂

Today the new parts arrived, which is why there will be a lot of new posts soon.
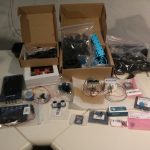
There is a [amazon &title=CubieTruck&text=CubieTruck] in it, better stepper motors, a lot of sensors, tracks and wheels – so a lot of work in a box 🙂
That’s one small step for a man, one giant leap for a small raspberry powered ROS robot.
Okay – maybe thats a bit too big – but I am in a good mood. I compiled the latest openni2_camera ros driver on the little arm cpu of the [amazon asin=B00LPESRUK&text=[amazon &title=Raspberry Pi&text=Raspberry Pi]]. Before that, I used the driver provided by kalectro (see source), which is an older fork but prepared for raspberry.
As a result of that, I’ve got some new features like the IR-Image stream I visualized with rviz :

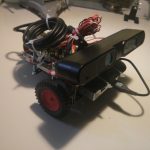
Raspberry Pi Robot with ROS
or the handy little parameter with which it is possible to skip some frames which reduces the load a bit:
set param name="camera/driver/data_skip" value="300"
rosrun openni2_camera openni2_camera_node
Now, running roscore on my laptop – I had some sensor_msg/Images I needed to convert into 3d depth data. After some little issues with faulty XML-launch files, I finally got openni2_launch up and running, which is a handy little launchfile using rgb_launch providing every data format you’ll can get out of the [amazon &title=Xtion&text=Asus Xtion].
roslaunch openni2_camera openni2.launch
Now I’ve had a /camera/depth/points topic, with a pointcloud2 datatype. Which is really nice because rviz can visualize it:

Raspberry Pi Robot with ROS – Xtion
Houston, we’ve had a problem.
Yes, there were times when it was possible to land on the moon by the power of a daily life calculator – but todays robots need more than that 🙂 So my aged Intel Centrino Core 2 Duo ASUS-F3J with 1,7Ghz each core isn’t able to do more than I reached today. It pops to 100% processing and after some time it collapses totally.
So todays lesson learned is:
Robots are distributed systems – by every measure.
So I’ll need more power.. again…
I’ve taken some code written by Stephen C Phillips and added/modified a few lines so its possible to run two motors at once, even with different directions.
#!/usr/bin/env python

# This code is written by Stephen C Phillips http://scphillips.com.
# and modified by Paul Petring http://defendtheplanet.net
# It is in the public domain, so you can do what you like with it
# but a link to our websites would be nice.

# It works on the [amazon &title=Raspberry Pi&text=Raspberry Pi] computer with the standard Debian Wheezy OS and
# the 28BJY-48 stepper motor with ULN2003 control board.

from time import sleep
import RPi.GPIO as GPIO
from thread import start_new_thread
import sys

class Motor(object):
    def __init__(self, pins):
        self.P1 = pins[0]
        self.P2 = pins[1]
        self.P3 = pins[2]
        self.P4 = pins[3]
        self.deg_per_step = 5.625 / 64
        self.steps_per_rev = int(360 / self.deg_per_step)  # 4096
        self.step_angle = 0  # Assume the way it is pointing is zero degrees
        for p in pins:
            GPIO.setup(p, GPIO.OUT)
            GPIO.output(p, 0)
    def __exit__(self, type, value, traceback):
       self.clean_pins_up()
    def _set_rpm(self, rpm):
        """Set the turn speed in RPM."""
        self._rpm = rpm
        # T is the amount of time to stop between signals
        self._T = (60.0 / rpm) / self.steps_per_rev

    # This means you can set "rpm" as if it is an attribute and
    # behind the scenes it sets the _T attribute
    rpm = property(lambda self: self._rpm, _set_rpm)
    def clean_pins_up(self):
        GPIO.output(self.P1, 0)
        GPIO.output(self.P2, 0)
        GPIO.output(self.P3, 0)
        GPIO.output(self.P4, 0)
def move_to(self, angle):
        """Take the shortest route to a particular angle (degrees)."""
        # Make sure there is a 1:1 mapping between angle and stepper angle
        target_step_angle = 8 * (int(angle / self.deg_per_step) / 8)
        steps = target_step_angle - self.step_angle
        steps = (steps % self.steps_per_rev)
        if steps > self.steps_per_rev / 2:
            steps -= self.steps_per_rev
            print "moving " + `steps` + " steps"
            self._move_acw(-steps / 8)
        else:
            print "moving " + `steps` + " steps"
            self._move_cw(steps / 8)
        #self.step_angle = target_step_angle #in case you want to keep track of the position
        self.step_angle = 0

    def _move_acw(self, big_steps):
        self.clean_pins_up()
        for i in range(big_steps):
            GPIO.output(self.P1, 0)
            sleep(self._T)
            GPIO.output(self.P3, 1)
            sleep(self._T)
            GPIO.output(self.P4, 0)
            sleep(self._T)
            GPIO.output(self.P2, 1)
            sleep(self._T)
            GPIO.output(self.P3, 0)
            sleep(self._T)
            GPIO.output(self.P1, 1)
            sleep(self._T)
            GPIO.output(self.P2, 0)
            sleep(self._T)
            GPIO.output(self.P4, 1)
            sleep(self._T)
        self.clean_pins_up()
def _move_cw(self, big_steps):
        GPIO.output(self.P1, 0)
        GPIO.output(self.P2, 0)
        GPIO.output(self.P3, 0)
        GPIO.output(self.P4, 0)
        for i in range(big_steps):
            GPIO.output(self.P3, 0)
            sleep(self._T)
            GPIO.output(self.P1, 1)
            sleep(self._T)
            GPIO.output(self.P4, 0)
            sleep(self._T)
            GPIO.output(self.P2, 1)
            sleep(self._T)
            GPIO.output(self.P1, 0)
            sleep(self._T)
            GPIO.output(self.P3, 1)
            sleep(self._T)
            GPIO.output(self.P2, 0)
            sleep(self._T)
            GPIO.output(self.P4, 1)
            sleep(self._T)
        self.clean_pins_up()
if __name__ == "__main__":
    GPIO.cleanup()
    GPIO.setmode(GPIO.BCM)
    m_l = Motor([2,3,14,15])
    m_r = Motor([10,9,11,25])
    m_l.rpm = float(sys.argv[1])
    m_r.rpm = float(sys.argv[1])
    print "Pause in seconds: " + `m_l._T`
    i = 1
    while i < 5:
       start_new_thread(m_l.move_to,(int(sys.argv[2]),))
       start_new_thread(m_r.move_to,(int(sys.argv[3]),))
       sleep(2)
       i=i+1
    GPIO.cleanup()
run the code with the following command:
sudo python motor.py 10 +90 -90
10 stands for rpm (rounds per minute) and +90 -90 as the amount of degrees each motor should turn. I figured out that, with this code and motors the max RPM is around 16, which results in a speed of 16 * 2 * Pi * Radius of your Wheel in cm / m.
This code only demonstrates how to turn the motors with a certain speed and degree. Its not made for rotating wheels yet..
Have fun experimenting 🙂
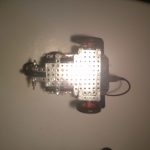
I’ve completed a new version today. It is a bit smaller and heavier, but already running ros hydro (I will write a small tutorial soon how to achieve that) with OpenNI2 and the ros-package openni2-camera. With that its possible to stream data to another computer visualizing the depth image of the [amazon &title=Asus Xtion&text=Asus Xtion] in rviz. I had some trouble solving and compiling all drivers, dependencies like ros-packages and libs like openCV (see Howto).
When the camera node is running the Raspberry is faced at with a processing load of 100%. The used network bandwidth is about 200-300 kb/s.
I suppose the raspberry Pi needs to be replaced by something stronger soon.
But for my first week in robotics, it’s something 🙂


Actually there is no need to explain more about stepper motors than that video does:
Currently I am using this python code to get the motors running:
#!/usr/bin/env python

# import required libs
import time
import RPi.GPIO as GPIO

GPIO.cleanup() #cleaning up in case GPIOS have been preactivated

# Use BCM GPIO references
# instead of physical pin numbers
GPIO.setmode(GPIO.BCM)

# be sure you are setting pins accordingly
# GPIO10,GPIO9,GPIO11,GPI25
StepPins = [10,9,11,25]

# Set all pins as output
for pin in StepPins:
  GPIO.setup(pin,GPIO.OUT)
  GPIO.output(pin, False)

#wait some time to start
time.sleep(0.5)

# Define some settings
StepCounter = 0
WaitTime = 0.0015

# Define simple sequence
StepCount1 = 4
Seq1 = []
Seq1 = range(0, StepCount1)
Seq1[0] = [1,0,0,0]
Seq1[1] = [0,1,0,0]
Seq1[2] = [0,0,1,0]
Seq1[3] = [0,0,0,1]

# Define advanced sequence
# as shown in manufacturers datasheet
StepCount2 = 8
Seq2 = []
Seq2 = range(0, StepCount2)
Seq2[0] = [1,0,0,0]
Seq2[1] = [1,1,0,0]
Seq2[2] = [0,1,0,0]
Seq2[3] = [0,1,1,0]
Seq2[4] = [0,0,1,0]
Seq2[5] = [0,0,1,1]
Seq2[6] = [0,0,0,1]
Seq2[7] = [1,0,0,1]

#Full torque
StepCount3 = 4
Seq3 = []
Seq3 = [3,2,1,0]
Seq3[0] = [0,0,1,1]
Seq3[1] = [1,0,0,1]
Seq3[2] = [1,1,0,0]
Seq3[3] = [0,1,1,0]

# set
Seq = Seq2
StepCount = StepCount2

# Start main loop
try:
  while 1==1:
    for pin in range(0, 4):
      xpin = StepPins[pin]
      if Seq[StepCounter][pin]!=0:
        #print " Step %i Enable %i" %(StepCounter,xpin)
        GPIO.output(xpin, True)
      else:
        GPIO.output(xpin, False)
    StepCounter += 1

  # If we reach the end of the sequence
  # start again
    if (StepCounter==StepCount):
      StepCounter = 0
    if (StepCounter<0):
      StepCounter = StepCount

  # Wait before moving on
    time.sleep(WaitTime)
except:
  GPIO.cleanup();
finally: #cleaning up and setting pins to low again (motors can get hot if you wont)
  GPIO.cleanup();
  for pin in StepPins:
    GPIO.setup(pin,GPIO.OUT)
    GPIO.output(pin, False)
it is based on code by matt.hawkins but with some improvements I did.
Please be sure you set your GPIOs accordingly to your [amazon &title=Raspberry Pi&text=Raspberry Pi] Revision. So mine was REV 2.0.
Run the code with
sudo python nameOfTheFile.py
and hit [Ctrl]+[C] to stop it. All pins will be set to low afterwards.
In case you want control two motors of this type see another post I made here.
For a different version see:
http://www.intorobotics.com/control-stepper-motors-raspberry-pi-tutorials-resources/http://www.elektronx.de/tutorials/schrittmotorsteuerung-mit-dem-raspberry-pi/
ROS is the Robot Operating System. Its really helpful for everyone who doesn’t want to reinvent the wheel when it comes to robotics.
In my opinion its a bit hard to have a start, and its easy to get confused because of the changes they did between multiple ROS versions.
Some stuff I can recommend:
Promising but not yet read:
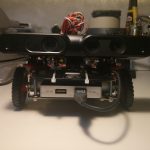
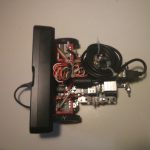
I am trying to build my own [amazon &title=Raspberry Pi&text=Raspberry Pi] based robot. Someday, it shall be able to drive autonomously based on data from its [amazon &title=Asus Xtion&text=Asus Xtion] (a smaller version of an Xbox Kinect) and with the help of ROS (Robot Operating System). For today, it is only capable of driving straight forward.

Parts:
With this setup, the raspberry i able to run at least 8 hours by the power of my already a little bit aged powerbank. Driving at an unbelievable slow speed of about 30 seconds per meter (full torque mode of steppers).
For documentation (and for fun, because I never did this before), here a small video of the very first test drive:
OpenCV is a powerful tool for building computer vision based applications. For one of my projects, I needed it to be compiled on my Raspberry.
Installing it from repositories was not an option because of its too old version.
If this wouldn’t bother you, consider using: sudo apt-get install libopencv-dev
Here is how I installed it on my Rasbian Wheezy from source:
sudo apt-get -y install build-essential cmake cmake-qt-gui pkg-config libpng12-0 libpng12-dev libpng++-dev libpng3 libpnglite-dev zlib1g-dbg zlib1g zlib1g-dev pngtools libtiff4-dev libtiff4 libtiffxx0c2 libtiff-tools libjpeg8 libjpeg8-dev libjpeg8-dbg libjpeg-progs ffmpeg libavcodec-dev libavcodec53 libavformat53 libavformat-dev libgstreamer0.10-0-dbg libgstreamer0.10-0 libgstreamer0.10-dev libxine1-ffmpeg libxine-dev libxine1-bin libunicap2 libunicap2-dev libdc1394-22-dev libdc1394-22 libdc1394-utils swig libv4l-0 libv4l-dev python-numpy libpython2.6 python-dev python2.6-dev libgtk2.0-dev pkg-config
downloading the zipfile into a folder located in $HOME
mkdir ~/opencv
cd ~/opencv
wget http://downloads.sourceforge.net/project/opencvlibrary/opencv-unix/2.4.9/opencv-2.4.9.zip
unzip opencv*.zip
cd opencv*
mkdir build
cd ./build/
cmake -D CMAKE_BUILD_TYPE=RELEASE -D CMAKE_INSTALL_PREFIX=/usr/local -D BUILD_PYTHON_SUPPORT=ON -D BUILD_EXAMPLES=ON
make
sudo make install
Make took about 6-7 hours on my Raspberry Pi, so be sure you have a stable connection or consider using a tool like ‘screen’.
Please also see:
For openni2_camera it’s not necessary to go further like other posts suggested.