Category Archives: Robotics

ROS Hydro / Indigo PointCloud to Laserscan for 2D Navigation

UPDATE: see my step by step guide for depthimage_to_laserscan here.

PointClouds need a lot of processing and network traffic load. For 2D navigation LaserScans are a good option to decrease this loads, in my case below to 30% of the original.

So after starting my customized openni2_launch (the launchers of openni_camera, and both ros drivers) with a custom Openni2 driver dir:

OPENNI2_DRIVERS_PATH=/usr/lib/OpenNI2/Drivers/ roslaunch /home/user/catkin_ws/src/robot_bringup/launch/openni2.launch

(OPENNI2_DRIVERS_PATH fixes all issues with the camera driver nodelet)

its possible to process this down to a /scan topic by:

rosrun depthimage_to_laserscan depthimage_to_laserscan image:=/camera/depth/image_raw

or directly in a launch file using the handy nodelet manager:

  <group>
    <node pkg="nodelet" type="nodelet" name="depthimage_to_laserscan" args="load depthimage_to_laserscan/DepthImageToLaserScanNodelet $(arg camera)/$(arg camera)_nodelet_manager">
      <param name="scan_height" value="10"/>
      <param name="output_frame_id" value="/$(arg camera)_depth_frame"/>
      <param name="range_min" value="0.45"/>
      <remap from="image" to="$(arg camera)/$(arg depth)/image_raw"/>
      <remap from="scan" to="$(arg scan_topic)"/>

      <remap from="$(arg camera)/image" to="$(arg camera)/$(arg depth)/image_raw"/>
      <remap from="$(arg camera)/scan" to="$(arg scan_topic)"/>
    </node>
  </group>

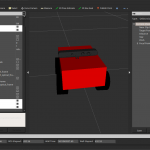
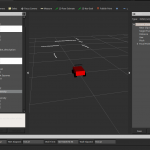
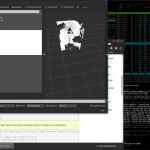
After that it is possible to visualize the new topic using rviz getting something like that:
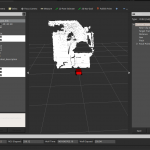
of course the robot is still able to laserscan with the xtion (now in rainbow indicating z of the camera)


ROS is about: simulation, simulation and simulation …

ROS needs to know everything about the physics of a robot. It starts with dimension to avoid collusions – both with the outside world and the robot itself (e.g. if it is using two robot arms at once).  Further it is relevant where the sensors are – or in my case where the [amazon &title=Asus Xtion&text=Asus Xtion] is located in relation to the robots base. Another interesting information are the robots joints. Its needed to drive the wheels and to rotate the camera. For all that, a detailed description and representation of the robot in a format that a computer understands is essential.

Today I’ve made a hugh step in the simulation field, so struggeling with the motors in the real world for the last few days doesn’t feel too bad – at least I can generate some nice pictures now:

For me an interesting journey started, with a lot ups and downs – currently I am really excited where we will be in 18 weeks – because 2 weeks of my thesis already passed.

First experiences with the ROS Unified Robot Description Format

The Unified Robot Description Format is a nice way to describe robots in ROS. It is a xml formatted file which contains robot related information like links – geometry figures such as boxes, cylinders or sketch-up models(!), Joints – the information how the links are connected to each other, e.g. if they are fixed or continuous and in which state they are (using tf, the ROS transformation package)  – and a lot of more stuff I didn’t figure out after a day with .urdf.
There also is some macro language called xacro, which seams to be pretty amazing, reducing xml code length, enable the usage of variables in it (like for scaling a whole bot) and much more.

it may look simple, but this little robot took a complete evening. He has 2 movable wheels in the front, custom colors and hopefully will drive around in simulation soon:

ScreenshotAmosero_1 ScreenshotAmosero

It’s possible to generate a graphiz dot graph and a pdf from the urdf using following command:

urdf_to_graphiz path/to/file.urdf

after that open it e.g. by

evince file.urdf

looks like that:ScreenshotAmosero_2

Arduino Micro /Leonardo and rosserial Hello World possible link problem?

Yesterday I’ve had to learn something the hard way. Please have a look at the following code of the rosserial “hello world” arduino example:

/*
 * rosserial Publisher Example
 * Prints "hello world!"
 */

#include <ros.h>
#include <std_msgs/String.h>

ros::NodeHandle  nh;

std_msgs::String str_msg;
ros::Publisher chatter("chatter", &str_msg);

char hello[13] = "hello world!";

void setup()
{
  nh.initNode();
  nh.advertise(chatter);
}

void loop()
{
  str_msg.data = hello;
  chatter.publish( &str_msg );
  nh.spinOnce();
  delay(1000);
}

Nothing special, right? So compiling it – uploading everything on the arduino works like a charm.

But starting it  rosrun rosserial_python serial_node.py /dev/ttyACM0 crashes with:

rosrun rosserial_python serial_node.py /dev/ttyACM0
[INFO] [WallTime: 1400737593.278250] ROS Serial Python Node
[INFO] [WallTime: 1400737595.610358] Connecting to /dev/ttyACM0 at 57600 baud
/home/yourUser/catkin_ws/src/rosserial/rosserial_python/src/rosserial_python/SerialClient.py:317: SyntaxWarning: The publisher should be created with an explicit keyword argument 'queue_size'. Please see http://wiki.ros.org/rospy/Overview/Publishers%20and%20Subscribers for more information.
  self.pub_diagnostics = rospy.Publisher('/diagnostics', diagnostic_msgs.msg.DiagnosticArray)
[ERROR] [WallTime: 1400737595.826375] Error opening serial: could not open port /dev/ttyACM0: [Errno 13] Permission denied: '/dev/ttyACM0'

which can be easily explained by normal users missing permission to access the /dev/ttyACM0. So I advice running it as root, which leads you to customize roots .bashrc including the source /home/yourUser/yourWorkspacePath/devel/setup.bash and the environment variables like ROS_HOSTNAME and ROS_MASTER.

So after that, running it again with root permissions, you’ll get another error message:

[INFO] [WallTime: 1400737809.741920] ROS Serial Python Node
[INFO] [WallTime: 1400737810.415142] Connecting to /dev/ttyACM0 at 57600 baud
/home/yourUser/catkin_ws/src/rosserial/rosserial_python/src/rosserial_python/SerialClient.py:317: SyntaxWarning: The publisher should be created with an explicit keyword argument 'queue_size'. Please see http://wiki.ros.org/rospy/Overview/Publishers%20and%20Subscribers for more information.
  self.pub_diagnostics = rospy.Publisher('/diagnostics', diagnostic_msgs.msg.DiagnosticArray)
[ERROR] [WallTime: 1400737827.716961] Unable to sync with device; possible link problem or link software version mismatch such as hydro rosserial_python with groovy Arduino

So – rosserial tries to connect to your /dev/ttyACM0 using 57600 baud and fails. The error message is kind of misleading – of course there is some syncing issue, and it has nothing to do with your ROS version… …but with your arduino!

Since the arduino micro / leonardo uses USB for and its build in serial-controller both for programming and communicating, rosserial needs the information to access the device not in the for arduino usual serial way but with USB. So simply adding

#define USE_USBCON

before the rest of the code, will tell ROS to do so.


Ultrasonic Sensor HC-SR04 as a ROS Range publisher

I’ve taken a HC-SR04 like shown below and connected it to the CubieTruck as a rosserial publisher.

IMG_20140512_114741


Instead a of a simple std_msgs::String str_msg;  I’ve implemented a sensor_msgs::Range range_msg; which after starting the arduino in ros with rosrun rosserial_python serial_node.py /dev/ttyACM0  shows up in rostopic echo /ultrasound like this:

---
header: 
  seq: 136
  stamp: 
    secs: 1400706588
    nsecs: 709593997
  frame_id: ultrasound
radiation_type: 0
field_of_view: 0.10000000149
min_range: 0.0
max_range: 4.0
range: 1.18762886524
---

So with that, its possible to visualize everything using rqt_plot:

ScreenshotROSUltraSound

which is pretty nice for my first arduino micro ros project and less than an two hours of work 🙂

For further information see here


Raspberry Pi Robot #2

I’ve connected the [amazon &title=Raspberry Pi&text=Raspberry Pi] to an L298N and two 6V DC Motors, which have been in the Makeblock Starter Kit. I’ve had some issues with the WPA2 Enterprise TLS Network, which is why there is an cable attached.

IMG_20140521_164828

I’ve also written a small geometry/Twist controller for ROS-compatibility,for controlling the robots movement with keyboard interop like I did before.

Before I dismantle this little robot, I’ve like to share a little video:
Youtube Video

As soon as possible I will use the arduino micro and the two 250rpm stepper motors – for that I am planning to use a Arduino Motor shield that I’ve already ordered.

Howto use CubieTruck and NetworkManager to do WPA2 Enterprise TLS

Last days the [amazon &title=CubieTruck&text=CubieTruck] made me struggle with its Network behavior. It continuously refused to connect to any WLAN, didn’t allow the Usage of the NetworkManager GUI, and confused me a lot.

Some things that might help you:

Wlan isn’t enabled by default – or at least it wasn’t for me.

Load the driver

modprobe bcmdhd

In case you don’t want to do that everytime the [amazon &title=CubieTruck&text=CubieTruck] needs wifi consider adding a new line with ‘bcmdhd’ (no quotes) to /etc/modules

I needed to install the linux firmware:

sudo apt-get install linux-firmware -y

and reboot

sudo reboot

3. bring the wlan0 device up and scan if your wlan is available

sudo -i #get root 
ifconfig wlan0 up
iwlist wlan0 scan

Check if the /etc/network/interfaces file looks something like that:

auto lo eth0
iface lo inet loopback

No additional lines, or the NetworkManager will struggle with your devices, showing them as “not managed” or “disconnected”.

So by default lubuntu 13.04 image, no Network manager has been running by boot, so I’ve fixed that by adding following line to my /etc/crontab:

@reboot /usr/sbin/NetworkManager

(sure there are other ways – especially because it’s a system service)

So after reboot – using the [amazon &title=CubieTruck&text=CubieTruck]-GUI its faces you with a “Network Manager not running”.

Screenshot[amazon &title=CubieTruck&text=CubieTruck]

So the small Icon on the taskbar isn’t able to find the network manager.
I could not fix that other than by opening an LXTerminal and:

sudo killall nm-applet && sudo nm-applet

which leads me to a nice WLAN GUI and made it possible to use WPA2 Enterprise with TLS 🙂

Howto control CubieTruck onboard LEDs

Today I wanted to know, what this little blinking lights on my [amazon &title=CubieTruck&text=CubieTruck] mean.

There are four, which you find out if you use:

root@cubietruck:/# ls /sys/class/leds/

blue:ph21:led1 green:ph07:led4 orange:ph20:led2 white:ph11:led3

(or just look at it while it is running, usually it blinks a lot)

IMG_20140520_123004

So if you want to know what each blink means you can ask the [amazon &title=CubieTruck&text=CubieTruck] like that:

root@cubietruck:cd /sys/class/leds/
root@cubietruck:/sys/class/leds# ls
blue:ph21:led1  green:ph07:led4  orange:ph20:led2  white:ph11:led3
root@cubietruck:/sys/class/leds# cat green:ph07:led4/trigger
none rfkill0 battery-charging-or-full battery-charging battery-full battery-charging-blink-full-solid ac-online usb-online [mmc0] mmc1 timer heartbeat cpu0 cpu1 default-on rfkill1 rfkill2 
root@cubietruck:/sys/class/leds# cat blue:ph21:led1/trigger
none rfkill0 battery-charging-or-full battery-charging battery-full battery-charging-blink-full-solid ac-online usb-online mmc0 mmc1 timer [heartbeat] cpu0 cpu1 default-on rfkill1 rfkill2 
root@cubietruck:/sys/class/leds# cat orange:ph20:led2/trigger
none rfkill0 battery-charging-or-full battery-charging battery-full battery-charging-blink-full-solid ac-online usb-online mmc0 mmc1 timer heartbeat [cpu0] cpu1 default-on rfkill1 rfkill2 
root@cubietruck:/sys/class/leds# cat white:ph11:led3/trigger
none rfkill0 battery-charging-or-full battery-charging battery-full battery-charging-blink-full-solid ac-online usb-online mmc0 mmc1 timer heartbeat cpu0 [cpu1] default-on rfkill1 rfkill2 

So by default the

  • green LED is indicating if there is any read write with the SD Card
  • blue LED is heartbeating
  • orange LED is CPU0 load
  • white LED is CPU1 load

In case you want to turn off the LEDS, use this code:

# turn off LEDs
echo 0 > /sys/class/leds/blue:ph21:led1/brightness
echo 0 > /sys/class/leds/green:ph07:led4/brightness
echo 0 > /sys/class/leds/white:ph11:led3/brightness
echo 0 > /sys/class/leds/orange:ph20:led2/brightness

See here for more information.

Howto run a 12V bipolar stepper motor with arduino micro and L298N at 150rpm

Today I experimented with a 12V bipolar stepper motor and the 5V arduino micro.

To get things working I’ve put the 9V from my six 1.5V Batteries into an UBEC which accelerates them to 12V at a loss of below 10% (at 350mAh) connected them to the VCC of the L298N and wired the 4 signal cables of the motors to it. Because thats a lot of numbers to keep track of – I’ve made a small video of the setup:

Youtube Video

Doing the math according to a wheel with 5,8cm heigth and 150rpm I’ve reached, my robot will be able to run about 1,6 km/h – this might be increased with a better motor driver like they used on the arduino motor shield. I’ve read they reached about 250 rpm on the same motor which would be 2,73km/h.

The code of the arduino is pretty simple:

#include <Stepper.h>

const int stepsPerRevolution = 200;  // change this to fit the number of steps per revolution
// for your motor


// init the stepper lib on pins 8 through 11:
Stepper myStepper(stepsPerRevolution, 8,9,10,11);            

void setup() {
  // nothing to do inside the setup
}

void loop() {
    myStepper.setSpeed(150);
    myStepper.step(stepsPerRevolution/100); 
}


ROS DepthCloud processing distributed

Today I achieved the following setup by dividing my openni2_launch files into two separate launchers beeing executed on two different machines: one for processing (nodelet_managing) running at a powerful server and one for streaming the [amazon &title=Xtion&text=Asus Xtion]-Image data from the [amazon &title=CubieTruck&text=CubieTruck] to the /camera -topic namespace. After that I could visualize, what my laptop wasn’t able to do before: a 3D DepthCloud with RGB-Data coloring in rviz. It has a native resolution of 640*480 and looks like that:

my first ROS 3D DepthCloud

I can’t say how efficient the load is balanced right now – because I am currently still optimizing.